2

Monday, July 9, 2012

Me and my Laundry Room

So it's off to the next project, the yellow laundry room. Why yellow? Why not! It's a bright cheery color that I think would make doing a load of laundry a little more fun or at least less boring. I have limited space in my house so  this room will do double duty as a workroom. It has to be bright, durable,  functional, well organized and still be pretty. All the other rooms on the lower level are gray, white and beige so yellow will be both a pleasant change and a nice compliment.


I've thought about it for some time and have a number of projects planned. 

1. Paint the walls yellow
2. Install gray or white floor
3. Find a new storage bench
4. Window treatments
5. Tackboard
6. Coat hook
7. New Laundry tub
8. Backsplash treatment
9. Reface cabinets
10. Counter over washer/dryer
11. Increase storage 
                                   
Oh man, this sounds ambitious. Now of course I want to do it on the cheap so I have to keep my eye out for bargains and do a lot of the work myself. It also means it will take some time so I have to be patient. When I'm finished I will have a fun, pleasant room to do laundry and a little bit of work. 

Thursday, July 5, 2012

One of a Kind Art

I know I've said it before, and trust me, I'll say it again, one of my favorite things to do is shop thrift stores. I go every week to see what's new. Sometimes I leave empty handed but most times I leave with a bargin. I will often buy something and hold on to it knowing eventually I'd find something special to use it for. Shopping thrift stores gives me an opportunity to be creative. The key is to go regularly and go with an open mind. Case in point, about three years ago I found this wood and ironwork picture frame at the Salvation Army thrift store.
I used it to frame some old family pictures but I was never really happy with it. I finally got bored and stored it in the basement. I was so tempted to re-donate it but I decided to keep it until I could find another use for it. Then a few weeks ago I found these cute little placards with images of vintage posters at the Habitat Restore for $5. Each are about the size of an index card, have a felt back and are laminated.

They probably were once in small table top picture frames but who knows. I thought they were cute and at $5 for the set I was sure I could find a use for them. It wasn't until a month or so later that I got the idea to use the wrought iron picture frame I had tucked away in the basement. The frames had no backing so I needed to attach them to a background that I could then clamp to the frame. I had a set of old woven placemats I wasn't using and thought they would make a nice textured background. I cut them into the 8x10 inch pieces and hot glued them to a piece of cardboard to give it a sold  background. 
I tried spray glue but because of the open weave it wouldn't stick to the cardboard. I then centered the pictures on the placemat and attached them with hot glue. 

Next I attached the pictures to the back of the frame and secured them with fasteners. The whole project only took a couple of hours to complete. And there you have it. From an old wrought iron frame and a $5 set of mini posters I created a one of a kind piece of artwork.


What one of kind artwork have you created for your home? I'd love to see pictures.

Monday, July 2, 2012

Lampshade Redo

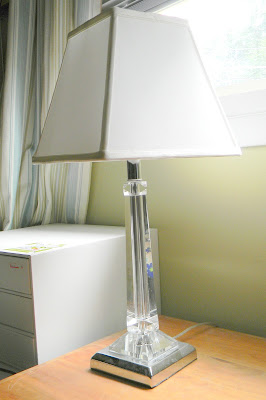
This is one of my favorite crystal lamps. Who am I kidding, they are all my favorites but its the only lamp I have with a square shade which should make it easy to update. Curves in general are trickier to deal with, just ask a quilter. This is my first attempt to to recover a shade but how bad could it turn out.
I've had this green floral fabric for quite a while. I bought a sample size for another project but decided not to use it. It's such a pretty fabric and I knew eventually I'd find a use for it and, well, here it is. 
To begin I carefully removed the trim around the top and bottom edge of the shade so I could reattach them later.
I then measured the width of the shade and cut strips of fabric using the shade as a template. I wanted to have a good balance of the floral pattern and the green background so two sides features a lot of the pattern and two sides feature a lot of the back ground.
Next I used spray adhesive to adhere the fabric to the shade. The top and bottom would be coverd by the original trim so I made sure not to go past the edge.
My original idea was to reuse the white trim but I didn't like how it looked with the fabric. I then thought to use green or gray ribbon and I still didn't like it. Then I thought about using the fabric to make the trim. I cut 1" strips, folded the edges in and ironed them flat. I then cut them the length of the shade and hot glued them on. I like this much better because it doesn't break up the pattern.
 
 Next I reattached the original white trim around the top and bottom and cut off any loose threads. Here is the final shade.
I am very happy with how it turned out. Not too bad for my first lampshade redo. I think I'm ready to tackle a round one and I already have something in mind.
  

Friday, June 29, 2012

Hammered Silver

I love the look of hammered metal especially silver. Serving bowls, vases, candle sticks, platters I love it all. I even love hammered silver jewelry. The texture and brightness of the metal adds elegance to any room and is much brighter than plain polished pieces. Silver is a highly reflective metal anyway but when it's hammered you get a faceted surface like a diamond which reflects more light and adds even more sparkle and shine. I have a couple of small hammered pieces but am keeping my eye open for a silver bowl for my dining room buffet or living room. The other day I picked up a stunning hammered silver bowl at TJ Maxx but immediately set it down when I saw the price. Way too rich for my blood but it was beautiful. I'll keep looking for something in my price range which is as always, $0 or next to nothing. Here are a few beauties to dream about.


Monday, June 25, 2012

Don't Try this at Home

This project has been sitting in my basement for a year. It's a solid oak table that once had glass inserts with a metal grid pattern but my wonderful son dropped something on it and cracked one of the glass pieces. Oh well. I know stuff happens but I thought this would be a good opportunity to make it a little more indestructible and decided to tile it.  
To begin I added some plywood to the underside of the table so I'd have something to set the tile on. I used nails and  construction glue so it should be pretty sturdy. I couldn't find a tile thick enough to come up to the top of the table so I used some left over floor tile to make the final top high enough. It kind of works but I can see this is starting to be an epic fail because the table is getting heavy. Epic fail?!! I'm spending way too much time with my son. Since I started down this path I decided to keep with it and see if it would work. The table was in my family room which has black stained Billy bookcases from Ikea so I decided to stain it black. Painting might have been easier but I wanted to see the wood grain as you can with the bookcases. I found a water based stain called Minwax Color Express in Onyx and thought it would be easy to apply. Besides it was on sale which always gets my attention. 


I started by cleaning all the gook that my son left on the table and then gave the top a good once over with my sander. For the legs I used a sheet of sandpaper because they were  curvy and the sander wouldn't work. Next I used a slightly damp cloth to clean the dust off the tops and legs. 



After I put on the first coat of stain I wondered if I was using this product right because it just turned the wood a little brown. 


This is the table after two coats. 


I told myself don't give up, keep going and give it another coat. I finally gave it four coats of the black stain to get the right color. It's jet black but you can still see the wood grain which is exactly what I wanted. 


One tip: Prop the table up on bricks so that you can get better access to the feet. These were some leftover paver stones that I used for a mosaic project. 


I know my son is going to give this tabletop a workout so I followed with three coats of water-based sealer to give it extra protection. Here is what the table looks like now.


The next step is to tile the top. The gray 2x2 mosaic tile that you see in the picture is what I chose. It has some beautiful metallic streaks in it and I think it will be just gorgeous when I'm done but I'm keeping my fingers crossed. Stay tuned for the finished table. 


BLOG DESIGN © 2012 SMITTEN BLOG DESIGNS/ CONTENT © 2012 MY HOME IN THE HEIGHTS