2

Showing posts with label Bathroom. Show all posts

Monday, September 17, 2012

Bathroom Reveal

It's finally complete. I have dragged this out long enough and I am ready to show off my bathroom. I had to work with a limited budget but believed if I can get the basics right I can always build from there.  Here is a before picture...

...and here is the after.


This was a difficult project because I had a limited budget and as we got into it I realized it  wasn't large enough. To compensate I had to sacrifice on some things but was fortunate to find a few bargins. We stripped the shower down to the studs and found mold. There was no insulation or water barrier and the bottom half of the wall was not tile, but paneling. It was disgusting and a disaster. The replacement of the shower took up more of my resources than I wanted but it absolutely had to be done. We put up a moisture barrier, insulated and replaced the drywall with cement board. No more water damage for me.  
 

For the shower we installed 6x6 ceramic tile in a brick pattern with a glass/stainless steel/marble accent strip. Next we took up the old black tile floor and replaced it with a 12 x 12 porcelain tile floor. We painted the walls gray, added a semi-frameless door from Arizona Shower doors and installed a new Kohler toilet. 

The big hurdle was what to do with the vanity. I couldn't decide if I should replace the entire vanity or just the top. My money started to run low so I decided to keep the vanity.  

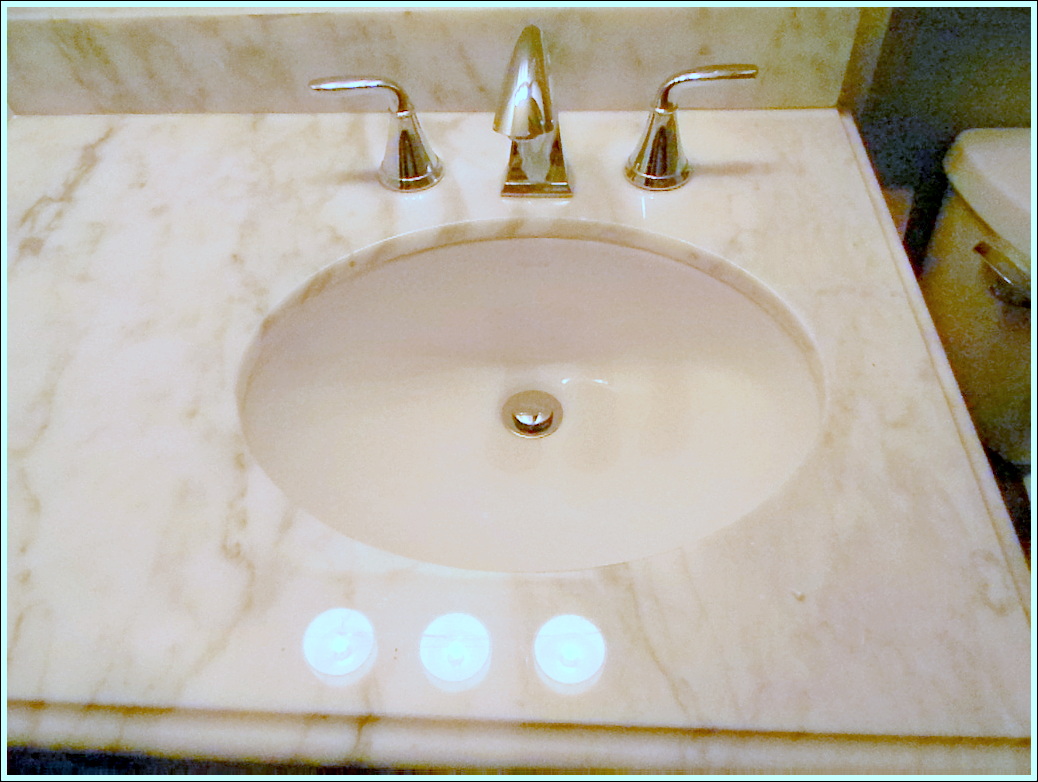
Thankfully I got super lucky when I found this beautiful 6 ft marble counter top for $35 at the Habitat Restore.

We cut it down to fit the existing vanity and it turned out perfect. 

We used the leftover marble to create a backsplash, installed a Kohler sink and finished with a beautiful chrome faucet and mirror which was made from a picture frame.                                          

I added new towel bars, a light over the vanity, hung a little artwork and called this project complete.

This bathroom is in a neutral gray and anything will go  with the tile I selected. It would be easy for me or anyone else to change the look or feel of the room with new towels and a can of paint. There are still a few things I want to do, such as replace the door and I need to have a new electrical outlet installed both of which will be done soon enough. 

I've wanted to redo my bathroom for years because I knew it was in bad shape. When my contractor, and my friend, said we are all done I squealed with joy. No really, ask him, I squealed. 

That's all she wrote. Now on to the next project.

Tuesday, September 4, 2012

Painting The White Door White


"Say What"? That is probably what you are thinking but let me explain. The cabinet doors for my bathroom had these silly little square pieces of Corian in the corners. The color matched the decor but when I removed the Corian countertop it didn't make sense to keep the chips any more so I removed them. I always thought they looked like a cheesy afterthought anyway. Unfortunately they didn't peel off easily and since the door is not wood it just took the top layer of the paper off. 


No biggie and nothing that a little drywall compound can't fix. 


To start I took the doors of the hinges and laid them flat so they would be easier to work with. I removed all the hardware and cleaned the doors with a little soap and water. 


Next I used a scraper to spread the compound in the corners and smoothed it out. It wasn't necessary to do the whole door. If you want you can also use spackle. The idea is to make it an even surface otherwise no matter how much you paint you are always going to see where the paper peeled.  


 After letting it dry for 24 hours I sanded it down so it was nice and even.


 Whether you are working with drywall compound or spackle, let it dry thoroughly before trying to sand it. After sanding and before painting use a cloth or an old sock to wipe off all the dust.


Next I sprayed the doors with white spray primer and two coats of white paint letting the paint dry thoroughly between coats. One tip: Let the doors dry for a full day so it has time to harden. The paint may be dry to the touch but if you pick up the door it will leave fingerprints and then it's back to the drawing board. 


Last step is to replace the hardware. The pulls on these cabinet doors are made of nickel and are  very heavy. I thought about replacing them with something more plain and streamlined but for now these are more than fine. 


That's all there was to it. This looks so much better don't you think.


To be honest I was a little concerned after I ripped off the Corian chips. I thought about replacing the doors but this worked out fine and I'm very happy with how they turned out. 

Monday, July 30, 2012

Silver Framed Mirror

I wanted a plain, chrome, 24" x 30" mirror for over the vanity in the downstairs bath. Lowe's had a very nice one that was close to what I wanted but it was only 18" wide. I thought that was a little too small so I kept looking. I then found this Southern Enterprise Vogue chrome mirror on Amazon.com that was close but once again it was just a little too small. So now what do I do. Should I just keep searching or
should I settle for something less than what I wanted. I did neither and got creative. I had a 24"x30" inch mirror tucked away in the basement that I never used. All I needed to do was find a silver picture frame. I spotted one at the thrift store for $0.75 but it was still a little too small. I next called around to some of the frame shops in the area and asked if they framed mirrors as well as artwork. I finally found a shop in Lansing Illinois called Van Der Weide's Glass & Mirror that quoted me $68 to frame the mirror. I brought it in, dropped it off and a couple of weeks later I had just what I wanted, a 24" x 30" simple chrome mirror and I love it. There was only one hiccup. I forgot that the light I bought was brushed so I am not crazy about the combo. My son says he digs it but still, it's a detail I missed. It's not too difficult to change down the line so for now I am very happy and satisfied with my custom mirror.  

So today we took down the old mirrored medicine cabinet, installed the light fixture and hung the mirror just to make sure it fit. I still have to paint the wall behind the mirror after repairing the damage done to the wall when we removed the medicine cabinet. 

Well, we are almost there. I can finally see the finished line which is good because I am ready to move on to other projects. All that's left is to paint the wall and buy some new towels. 

Monday, July 23, 2012

Bathroom Update - Mable Sink

My contractor and I finally got around to the sink. I was so excited about finding this beautiful marble counter top at the Habitat Restore for just $35. I never realized it would be so difficult to modify and install it. 
The top was 6 feet wide so we first had to cut it down making sure the sink was in the right spot because the opening was not centered. 

I purchased a standard size Kohler sink but when I got it home it was much too big. I shopped every home improvement store, including plumbing stores and no one had it smaller. I finally found it through Amazon.com. It was the same model as the first purchase except it was the next size down. 

Our next obstacle was the backsplash. The top came with a backsplash that was tapered on the ends and higher in the middle which was meant to sit behind the faucet. When we cut the backsplash to to fit the length and width of the sink it looked horrible because it was not straight and even. I asked my contractor if we could take what was left of the top and cut two 4" strips of marble and polish the edges. 


He cut the new backsplash, did a dry fit and it looked so much better because it was a much cleaner detailThe last step was to install the polished chrome Pfister wideset faucet, caulk the edges and now my $35 marble counter is finished. 


I wanted a real stone counter top for my bathroom but did not think I could afford it. I am so glad (and lucky) I decided to stop by Habitat that day. I think it looks so pretty and I could not be happier with it. 

Next up, the custom mirror. 

Monday, July 16, 2012

Bathroom Update Three

So here are the latest bathroom updates. It's been hard work but we are more than halfway finished. We've painted the walls a medium shade of blue-gray. The paint I originally chose was a pale gray but my son thought it was too light. I disagreed and bought the pale gray anyway and wouldn't you know it, it was the exact same color I had before.
In this case I had to go along with my son and use a darker gray. It's really his bathroom and I didn't want it to be 100% my finish choices. (That's my story and I'm sticking to it) Everything else is so light that a darker gray would add some contrast to the floor and wall tile.
 
The toilet, shower door, shower head and towel bars have all been installed which is great news for me because now I can kick my son out of my bathroom.
 My son really likes simple pieces with square lines so I found a towel bar in my budget that was square. I couldn't get all fixtures with a square detail but I managed to find a few.   
My next update will show the beautiful marble vanity top which I got at a steal from The Habitat Restore for $35. My contractor is working on it now and it looks like it will be gorgeous. Also a custom mirror that I made from an existing mirror that I've had at the house for a few years and simple silver frame. More on that later so stay tuned.

Monday, June 4, 2012

A Steal for the Bathroom

For the last several months I have been debating whether or not to get a new vanity for the downstairs bathroom. I finally decided to keep the vanity but the jury was still out on whether or not to replace the countertop. 

It currently has a gray Corian top with an ivory bowl and a dingy old single handle faucet both of which have seen better days. I could replace the faucet, definitely, and replace the sink, maybe, but the countertop is in good shape and went with the overall color scheme. What I really wanted was natural stone, preferably granite but I couldn’t find what I wanted that fit within my price range which was between $0 and next to nothing. That was all resolved when over the weekend I found this beauty at Habitat Restore.


It is a six foot long white marble top with light gray veining, an ogee edge, cut outs to accommodate an  undermount sink and widespread faucet and I got for a steal at just $35. Can you believe it!!?? SCORE!!! I paid for it right then and there and called my contractor to help me pick it up. A piece like this might normally sell for about $500 so I could not walk away from such a good deal.


The existing vanity counter top is about 32" inches wide with an off center sink because there are drawers on the left side. After we cut the marble to fit the vanity there will be enough left over to use for another application. Not sure what I'll do with it but I can worry about that another day. I can't wait to see it in. 

Friday, May 25, 2012

Happy Accidents


After months of trying to decide on what accent tile to use for my bathroom shower I opted for a watery blue glass and marble mosaic tile. They were $12 bucks a sq ft so I could only afford a few sheets. A few days later my contractor and I were all set to install the tile and when I opened the box I realized it was the wrong tile. Oh man! Now I would have to put my project on hold and go back to store to sort it out. Before I did I decided to see how it looked in the bathroom. Good decision, because it looked great. It is at least as beautiful if not more so than what I had previously chosen. It has white frosted and gray glass tiles with marble and silver metallic accents. It tied the grays in well with the white and would work with any color I painted the bathroom. Also, if I remembered correctly, it was a little more expensive than what I had picked. 


I am glad the store made the mistake and chose the tile for me. The lesson I learned with this experience is that you should  always check what you purchase before you leave the store. Second lesson learned was check to see if what you got is at least as good if not better than what you wanted. You could be surprised by the outcome. It worked out well for me this time, but I won't make that mistake again.
                        

Monday, May 7, 2012

Chrome Faucets Everywhere

We're starting to wrap things up in the downstairs bathroom so I've been shopping for a chrome faucet. Ever notice when a woman puts on a cute outfit, does her makeup and styles her hair her look is never quite finished until she puts on the jewelry. If she chooses to wear a shiny pair of earrings instantly her face seems brighter and her look is more finished or polished. That's what a chrome faucet does. It finishes the look of your bathroom. It adds sparkle and shine more so than any other finish and really dresses up a bathroom.  

Most faucets are either centerset, wide spread or single handle but there are other styles like wall mounted and waterfall which are mainly used with vessel sinks. They also come in other finishes like bronze and nickel but for me chrome is the best. 


For my bathroom I want to have a little fun with the faucet. I still have to keep a reign on the spending but I don't have to choose a run of the mill crystal handle faucet.  I checked out the local home improvement stores and saw several nice faucets but I wanted to see more and decided to shop on line. OMG!. There are 1001 different manufacturers, finishes and styles to choose from. I felt like Robin Williams in Moscow on the Hudson when he saw all the coffee coffee cans in the grocery store and became overwhelmed.    

                          
I had no idea faucets had come so far and could cost so much. Some of them looked like something out of 2001: A Space Odyssey. Others didn't look like faucets at all but more like sculpture. Here are some of the faucets that caught my eye. 

                                     
Single Hole
Widespread
I am no where near making a decision but I am having fun shopping. 

B.
 
BLOG DESIGN © 2012 SMITTEN BLOG DESIGNS/ CONTENT © 2012 MY HOME IN THE HEIGHTS