2

Showing posts with label Crafts. Show all posts

Wednesday, December 10, 2014

Christmas Craft - Fabric Wrapped Balls


Ever order fabric on line only to find out when you get it that it's not what you thought it was. I bought this pretty, shimmery, aqua blue fabric to make a pillow cover. When I opened the package I realized that what I ordered was a knit jersey fabric and totally not suitable for my project. It might have helped if I read the fiber content but what can I say, I was blinded by the pretty blue color. Now I have this very pretty but very stretchy aqua blue fabric that I had absolutely no idea what to do with. Then I remembered seeing on Pinterest a craft project for fabric wrapped balls and thought I could finally use that fabric. 

It is super simple to make the balls. All you need is fabric, some ribbon or strips of fabric and a Styrofoam or craft ball. If you prefer, you can even use an old Christmas ornament or tennis ball. I had a few Styrofoam balls I recently found at the thrift store for only $1.45. I simply cut a piece of my stretchy fabric large enough to wrap around the ball leaving enough leftover to gather at the top. Then I took a piece of ribbon and tied it around the top to secure it.

Since I had some left over herringbone ribbon I also cut it into strips and wrapped it around the ball and secured it using a hot glue gun. You can see full instructions for wrapping the balls in fabric strips at the Better Homes and Gardens link for Fabric Scrap Balls. If you don't have a glue gun you can also use pins to secure the fabric strips or ribbon. There are really easy instructions to follow at This Silly Girls Life blog. 
When I finished wrapping the balls I placed them in this lovely aqua and white glass dish I purchased from HomeGoods earlier this year. To give it a little added sparkle I added in a few gleaming silver bells and some painted white gourds I had on hand. Such a pretty and festive setting for my coffee table. 
I put the bowl on a piece of blue fabric I bought at the thrift store a few weeks ago. I think it cost $1 or $2.
This was a very easy and quick project.  My head is now spinning thinking of other possible projects using this technique. I can't wait to do it again.

Happy Holidays!!

B.

Wednesday, January 8, 2014

Pretty Papered Tray

I love a decorative tray because they are both beautiful and practical. They add a pop of color to a table and they can keep a nightstand from becoming cluttered.  
BHG

I love this beautiful rich red flowered tray from Belle & June. If only I could paint.
Belle & June
Over the past couple of years I have collected a few wooden trays which I painted and posted about here and here. A third tray I found at the thrift store last year. It is 12" square and had plain white ceramic tiles that my dumb butt thought I could just crack and remove the tile. WRONG!. They were stuck so firmly to the bottom I nearly destroyed the tray trying to pry them out. 
So now what. My first thought was to tile over the bottom and until I ran into this post by Sarah at Cozy Cottage Cute where she used decorative paper to redo her tray. 
Cozy Cottage Cute
Cheap, quick, cute, perfect.

I took a trip over to Joann's fabrics and perused the paper  area. Decorative papers are fun to look at so if you plan to look for fancy paper to cover a tray, plan on spending a few minutes. I settled on these three as options.
I felt the spice rack paper was more kitchen oriented and I would be limited in where I could put it. The blue paper was a little to plain so the perfect choice was the Route 66 graphic.
This historic road runs through my home state of Illinois so I think it's appropriate and the blue, gray and pale yellow colors will make it easy to use in any room. Before I can do anything I have to repair the tray. I had some drywall compound on hand so I roughed up the tile and filled in the hole i made. I let it dry and harden for a day and then sanded it down.
Good as new. Or at least good enough to paper over. Now on to decorating the tray. I had previously painted the tray this soft gray so all I had to do was attach the paper. To start, I cut down the paper to fit the tray.
Using Mod Podge I spread a thin layer of the medium over the tile and let it dry a little until it was tacky. I then carefully laid the paper down and smooth out the edges with an old credit card and let it dry. Next I put two layers of Mod Podge on the top to seal it letting it dry completely between coats. Here is the completed tray.
You can find wooden trays that are painted or unpainted anywhere and everywhere. As long as it is the size you want you can change the appearance with a little fancy paper and a jar of Mod Podge. My favorite thing about using the Mod Podge on this decorative paper is the antiqued texture it give to it. It makes the paper more vibrant and interesting. 

Send me picks of your tray projects. I'd love to see your vision for transforming a tray.

trayTBarbara

Thursday, January 31, 2013

Seashell Mirror: Part 1

I really like the look of seashell mirrors. I like that no matter what, no two can ever be the same because no two seashell are the same. One day I found at the thrift store one of those old seashell wind chimes they had back in the 70's. 
I loved that it had a ton of shells and thought it would be a great start to make a seashell mirror. It was only $1.95 so I bought it. As for the mirror, I could buy a new one but since I believe in reusing what I already own I decided to use one I purchased at the thrift store several years ago for about $12. 
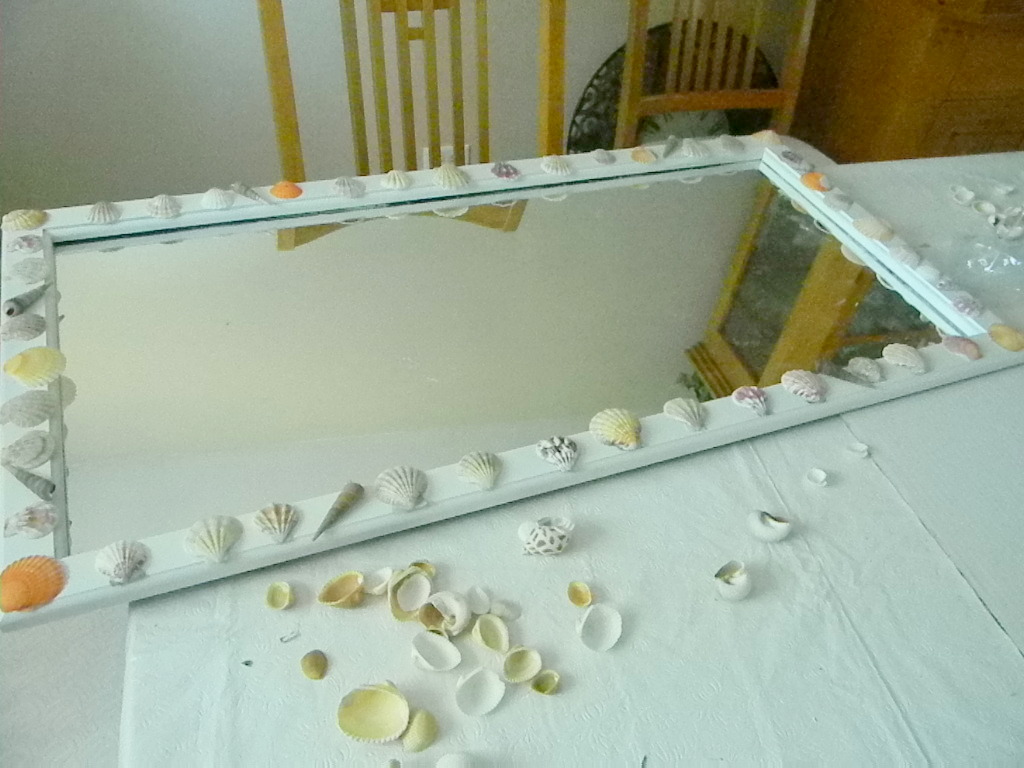
Before I began I painted the frame white. I didn't want the wood showing through if I missed a spot and the white paint would help disguise it. I also separated the shells in different sizes to see how much of each size I actually had to work with. I started laying out the pieces on the mirror to see what kind of pattern I wanted. I felt it should look random but needed to be organized. 
I could see I did not have enough so I bought a few more bags from the dollar store.
Before gluing any pieces down I determined how and where I wanted to hang the mirror. I won't be able to add the wall hook after I attach the shells so it's best to decide now where to attach the hooks. I want this to hang over a cabinet outside the bathroom so it would have to be horizontal. I moved the existing hooks to the short ends of the mirror and positioned them so that the hook would not show when I hung it. 

The first step was to glue the smallest shells along the inside rim with my hot glue gun. I then followed with another row of slightly larger shells. So far so good.

I then glued the larger shells all around the front part of the frame. Before I glued any of the shells down I laid them out to make sure I had enough and made any necessary adjustments. I'm about halfway finished and here is how it looks now. 
I had to stop here because...well...I ran out of glue sticks. Anyway, my next step is to buy more glue and fill in all the gaps with more shells. Stay tuned for part 2.

B.

Wednesday, September 19, 2012

Mosaic Pot 2

I wrote last week about my first mosaic pot. The second pot I made is a little different. Just as before I began by sealing the pot with a mixture of white glue and water. After drying I used high gloss black paint around the rim making sure to also paint the inside of the rim because you will see the inside of the pot. Next I smashed bright red ceramic tile for the body of the pot and used small white pebbles as an accent. I also added a row of black tile across the bottom and the top underneath the rim. As with the first pot I used construction adhesive for outdoor projects to glue the pieces because it's very secure. 


Next wearing a rubber glove I used sanded grout to fill in all the spaces. I used a sponge to spread the grout all around the pot and began to wipe down the tile making sure to rinse out the sponge several times.  Remember, do not pour the dirty water down the drain because you will damage your pipes. You will need to pour it outside. I followed with a damp cloth to clean off the tile.  


Once the grout dried I cleaned any residue off the tiles and as much as I could off the pebbles. The next day after the grout was completely dried  I touched up the rim of the pot with high gloss black paint. I finished by adding sealer to the grout lines and  spray paint sealer along the rim.

Here is the pot after cleaning up the grout and touching up the paint. 


I had fun making the pots but now it's time to start another mosaic project. Since summer is almost over I may turn my sites to something different. 

Monday, September 10, 2012

Mosaic Pot 1

I am pretty much into all things creative. One of my recent interests is mosaics. I don't know when or why I became interested in mosaics but I think it was because of how it related to my love of quilts. A lot of the same principles of quilting can be found with mosaics. In designing a mosaic you have to choose a medium such as glass tile, broken dishes, ceramics or less common materials like mirror or wood. You have to decide how to lay it out, how to construct or adhere it, what colors to use, how big to make it and what you will use it for. These are all considerations used when making a quilt. What I like most about mosaics is that precision isn't necessary unless you want it to be. I personally prefer the randomness of most mosaics and the fact that they are not always perfect which makes them one of a kind. 

I began making mosaic stepping stones which I have scattered throughout the yard. The daisies were made using a combination of golden broken dishes for the background, glass mosaic tile for the stems and leaves, white ceramic wall tile for the petals and glass pebbles for the center. The second stepping stone was white ceramic and colored mosaic wall tile. 

                                         
 The Blue stepping stone was made out of broken dishes and blue ceramic wall tile.
The last two were made with stained glass mosaic tile using classic Nine Patch and Trip Around the World quilt patterns.  


Lately I've had a thing for mosaic flower pots. The fist few I made were horrible and were promptly tossed into the trash but I have since improved. Unfortunately the photos I have showing how I pieced them together are missing so I will have to describe it. 

Before I started I painted the rim with two coats of green acrylic paint. On the inside of the pot I created a sealer by mixing white glue with a little water. There are all kinds of sealers on the market you can use but glue and water should work fine.  I like to have a top and a bottom and fill in the middle so I added a row of black cermaic tile along the bottom and underneath the rim. Next I drew the flowers on the pot in random order and size so that I would have a guide for placing the tiles. I chose to make the first pot out of 4 x 4  glazed ceramic wall tile. Using a floor tile cutter I cut strips of white and beige tile and then cut them in random lengths.  Next I nipped the tiles to taper it on one end and round it on the other. I used glass pebbles to make the center of the flowers. Next I glued down the petals and then filled in with dark and light blue broken tiles. I will share with you what I learned about breaking tile another day. I prefer to use construction adhesive made especially for out door projects because once it dries the tile won't budge. Once tile has set for a day I filled in the spaces with premixed grout. First tip: If you are going to do a lot of pots it's worth it to mix your own. The premixed is more expensive and one small tub will only grout about three large pots. 

Here is a picture of the pot before adding the grout.
Wearing rubber gloves to protect my hands I grabbed a handful of grout and spread it all over the pot working the grout into all the crevices.
Next I took a wet sponge and wiped all round the pot rinsing the sponge often. Second tip: I used sanded grout but next time I will try un-sanded. The sanded is messier and harder to clean. 
After the grout has dried I used a damp towel and continued to wipe the grout off the tiles. Last tip: DO NOT POUR THE USED WATER DOWN THE DRAIN. You Have to pour it outside because you will damage your pipes.
Once the grout has set and cured for a couple of days I used grout sealer to seal it and used spray paint sealer to protect the painted rim.
That's all there is to it. This is the first mosaic pot I made (successfully) and I am quite proud of it. I am in the middle of another which I will show once finished. 


Pot number two coming soon. 
 
BLOG DESIGN © 2012 SMITTEN BLOG DESIGNS/ CONTENT © 2012 MY HOME IN THE HEIGHTS